Buck Hollow Sporting Goods - click or touch to visit their website Midwest Habitat Company

Tower blind questions

BJohnson

Well-Known Member
Tower blind (progress update)

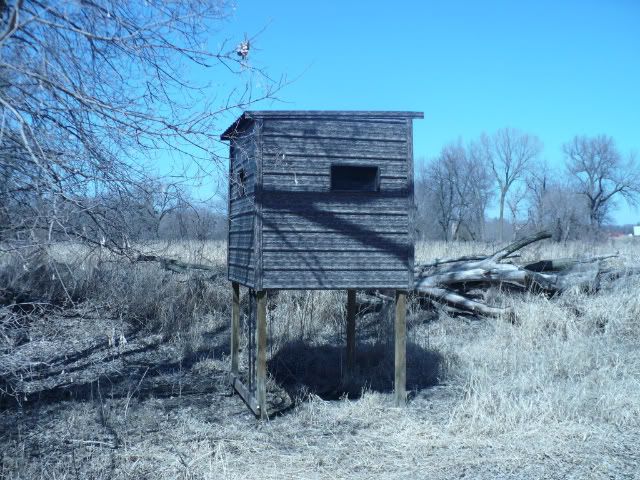
I have started the process of constructing a 6x6 tower blind. The basic idea is as follows:

1) pedestal - four 4x6x14' treated posts, sunk 36-48" deep, approx platform height goal is 10'. Landowner and I plan on setting posts with quick-crete also ?? I remember Critter applied Black Jack to the portion of his pedestal posts that were going to be under ground so I have given some thought to that but the posts are rated for underground applications per Menards.

2) 6x6' box blind on top of platform - submarine door in floor for access, three 36'Wx24"H windows (front and 2 sides) and one 24x24" window (back wall). Front wall height is 88" and back wall is 74" (sloped flat roof).

3) flooring will be 5/8 or 3/4" plywood. 2x6 joints spaced 24" on center.

4) window heights are planned for 38" from floor so window openings are 38" to 62". I tried to arrive at a opening which would work for both sitting bow/gun shots and/or standing bow shots ?? Height is a little low but I want this blind to be youth friendly for my kids and landowners g-kids.


Here is a early progress photo of the box blind tacked together in the driveway from a couple days ago. I plan to hoist each wall up separately and nail/screw into place once I have the box construction basically formatted.

picture.php


A couple questions for those who have played this game before.

1) when setting the posts, we (landowner and I) thought we would dig all four posts at once but set only 1 post initially. Get that one set and plumbed up good then work on the remaining 3 posts. In order to get the 4 posts to fit the 6x6" exterior platform box correctly, is it better to set each of the remaining 3 posts individually or the remaining 3 all together and use the box to tack them down for proper positioning and fit??

2) does a person need to put any type of material in the bottom of the post holes before inserting the post or partially fill some quick-crete in the hole before inserting the post? I can always trim the tops of the posts with a chainsaw to get heights evened out and level.

Any other comments on windows suggestions, window heights, etc. would be appreciated. Everything I have done so far is screwed rather than nailed so I can modify most anything except overall dimensions up to this point.
 
Last edited:
BJ, I suggest looking at the website Shadow Hunter.com. They build box blinds and use steel "elevators" that attach to your 4 x 4 posts. I used these for our boxes and have to say they make setting and securing the box a lot easier. Also, take a look at their window system. The best I've seen. Very quiet, right size, easy to install.
 
Well, landowner and I set two posts today. We dug all four post holes using a 6x6 box for a template for the hole locations. Decided we would crete and plum up one post first and then adjust the remaining post locations from there. Ended up setting one add'l post and attached a cross brace at the top to make sure the two set together with the proper spacing for the desired 6x6 platform size.

Noticed the remaining two holes are a little too close. Ok at the bottom but too far apart at the top so I will need to enlarge the hole sizes to get the proper spacing at the top and still get the posts relatively plum vertically and properly spaced. Hopefull the enlarged holes add to the stability of the last two posts and the base overall.

Here is the day's work on the platform. Looks vertically off but the two posts attached together at the top are pretty good vertically even though it does not look like it from the angle of the photo. Once all the posts are set a little trimming on the post heights and I should be hoisting up wall sections next weekend (maybe).


picture.php
 
Last edited:
Tonight my 11 yr old twins and I finished up with the pedestal-platform portion of the tower blind. I am slightly off square which was a worry of mine but I believe it is manageable. If I had it to do over again, I would run strings after my holes are dug to get a perfect square box and use that for a placement guide when setting the posts. I set the first two with the landowner and did the last two myself (patience is not a strength of mine after I begin a project).

I still think the walls will fit ok and the blind will come together in a sufficient manner.

Here is a view of the pedestal with my helpers on the platform.

picture.php


Here is a view to the south from on top of the platform. I am already imagining where the next one of these is going somewhere in this view.

picture.php
 
Cement the day-lights out of it and I sure hope you dug those holes really deep!!! I've seen the best set-ups fall over with our horrible wind storms, it's surprised me on numerous occasions. I'll be doing the same thing as you in a month. Looks really nice, awesome work and job!!! You're gonna love that! I have lots of other ideas to reinforce that so it can never tip over BUT I'm sure you got that covered (earth anchors, extra legs angling off side to secure to ground, etc, etc). I always come up with height of windows by putting my favorite chair in there and going through the motions BUT I also consider the elevation- can't remember my height BUT each blind ends up being however I like to hold my gun/bow with chair or whatever. Basic obvious stuff you already know. you look like you got a darn good handle on this. Put up updated pics when totally done!
 
Sligh1,

Holes are 36-40" deep. 36"s (fronts) are bigger in diameter and are ending up with about 4-5 bags of quick-rete in them. Back holes are closer to 40"+ and have at least 3 bags each. I also read where you could use some supplemental means to support so I will talk to the landowner about wire cables to some earth anchors, etc. It will be up to him as to how much of that stuff he wants to mow around when it comes time to cut hay surrounding the tillable acres. The blind location will be quite sheltered as it relates to NW-N-NE winds so our main concern for wind direction is anything southerly.
 
you SHOULD be good. I'm doing same thing, I'm digging 4' down and cementing the piss outta them. I've done 4 earth anchors per blind before with success, may not be needed though???? Depends on how big, how much wind it catches, etc. I just can't tell folks enough- do 2-3 times MORE than you think you need to so you secure you're blind. I've seen the best of them tip over with our brutal winds. I've seen a monster 2,000 lbs blind crash over, tower blinds, blinds with angled legs, etc. Better safe than sorry and with our weather, I'm seeing more folks on the side of SORRY vs safe. You're on it though BJ- looking good my man!
 
Today's progress update

Today's goal was to place the walls and roof 2x4 stringers. I was lucky to have an unusually calm day as I was unable to hook up with any friends for assistance hoisting the wall panels to the 10ft platform. I decided to push the panels up the ladder rails until I was high enough to lift up on the platform. Luckily, I was able to balance all the panels and not drop or break anything.

Here is a photo with 2 of the 4 walls tacked into place.

picture.php


Here are two angles of the blind once the walls and roof stringers were into place. Blind has three 24Hx36W windows openings. Front wall interior height is 86"+ and back wall interior height is 74"+ so I can stand fully upright in the inside.

picture.php


picture.php


Next up is finalizing choice of windows and exterior materials and starting to sheet and shingle the roof. So far I am pretty pleased with this first attempt at this type of project.
 
Last edited:
I was just talking with my son about building a couple of these. I am very interested in this post, it looks really sturdy. :)


You may even want to enclose the bottom portion and make it handicapped accessible. You would be making it stable and more useful at the same time. Cross bracing would still be used but walls would also add to the stoutness.

I made a tower blind ten feet off the ground and then stood back and looked and envisioned another blind below it that was handicapped accessible. It turned out great, IMO:)
 
Very nice :way:

Choose the treebark camo option for exterior steel and she'll look something like this when you're done :D

P1020564.jpg


NWBuck
 
NW Buck,

The landowner will dictate the choice of exterior material and he wants to use log siding. It is the same material he used on the weekend cabin on the property and he wants the same look. It will complicate the exterior process and will take more time to complete but obviously it's his property and I am not going to argue with him.:rolleyes:

Should look pretty sweet when it's done.
 
Your blind is really looking good. I am interested in a similar one for my place. Keep the updates and pictures coming.
 
We have built several elevated blinds. 6x6 is an ideal size. Also there is absolutely no reason for the floor to be more than 7 feet off the ground as far as the deer are concerned. We have shot several 5&6 yr old deer out of the blinds the first year we hunted them. Working 7 feet off the ground is a lot easier than 10-15. We frame them up like a small house and use 24x24 single slide windows from menards or home depot.
They used to have double slide but don't now. For the outside we use the 4x8 sheets of cement siding. The siding keeps the tree rats from chewing on the blind.
We also enclose 2 or 3 sides of the bottom to be able to exit the stand with out deer in the field seeing us. We use a lift out trap door and put foam weather strip around the lip to silence the door going back in.
Keep an eye out at auctions for scaffolding as this makes the construction easier and safer.
 
Looks good so far. I'd go out of my way to seal up the eaves and soffits on that roof area. It would suck to go hunt that blind early in the season and end up jumping in that blind with a gigantic nest of hornets/bees/muddobbers.

If you could use steel on the roof I think it would be a nice option. 3 pieces could be cut to fit on the ground and then hauled up and fastened in an hours time. Shingling that little area could be an adventure. Just a thought.
 
This week's focus has been sheeting the roof and sides of the box blind. Also, I needed to attached a ladder and ladder platform as the landowner and I decided the flip-up door in the floor was not what we wanted.

Here is a close up of the ladder and ladder platform. I was able to use the ladder as support for the platform with this design and it felt pretty sturdy when it was done.

picture.php


Here is a photo from farther away showing today's progress. Roof sheeting is done and about 2/3's of the side sheeting is done. Landowner wants log siding over the plywood so the sheeting will help with the log siding attachment and related trim. The ladder sticks out a little more than I would like but at least it's on the backside of the blind location.

picture.php
 
Very cool post, that thing looks sweet!

Bloodhoundhandler has one of these blinds...probably one of the best I've ever seen. Like a little mini house on stilts in the timber.
 
Progress update

Been a couple weeks since I got anything significant done on the box blind. This weekend I finally figured out my windows. I made shutter style windows which open in. The windows are made from 2x2 cedar with plexiglass. The landowner wants to have some form of outside window coverings (most likely plywood shutters) and wanted this style of window. I made my best effort to come up something that fit his description. If I had it to do over, I would simply buy some store bought windows and be done with it. But again, his ground so I am doing this project his way.

Here is a photo of the windows with one opened to the inside. Certain windows swing horizontally and some windows swing up. I can open all the windows and they all swing completely out of the way and do not obstruct each other. The positive thing about this setup is I will have more side to side range to take shots out of each window.

picture.php


Today we also started putting up some of the log siding. I gotta admit, I wasn't a huge fan of this idea but it looks pretty sweet and will look really neat in the fall and winter.

picture.php


Hopefully I can get this darn thing done by the end of July. I am getting a little worn out with the project and want to stay out of the property for a while before Sept.-Oct.
 
Top Bottom